I was playing with gradients in Gimp and Inkscape and in this process, I came to know about a few things which I think would be apt if I share here (even though many may find it redundant or silly ;p ).
Here is a small account of basics about Gradient, how to create and share gradients.
Gradient, as you may know is gradual change or blending of color. As you will see in nature the colors of objects are not constant all over even though their skin is of same color. Just for example look at the nearest wall(if its painted with single color ), does the shade appear to vary ? Either due to the lighting or shape, the color of the object will appear to vary. That is where a simple gradient comes into picture. When you are imitating or illustrating objects it is quite necessary to use gradients to give it a realistic touch.
 (Black to white Gradient)
Now talking about the gradient and how is it represented in softwares like Gimp and Inkscape,
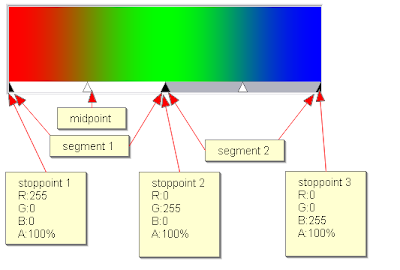
These are the basic features of a gradient irrespective of software:
1) Stops or stoppoints(endpoint): a gradient has atleast 2 stoppoints. Each stoppoint has properties of color,opacity(represented in terms of RGBA (Red,Green,Blue,Alpha) and position.
2) The region between 2 stoppoints is called a segment. The color from left stoppoint blends into right stoppoint within this segment. Blending function(linear,curved,sinusoidal, etc.,) is a function which defines how the colors blend into each other within a segment. There is also a midpoint which defines the middle point for the blending process.
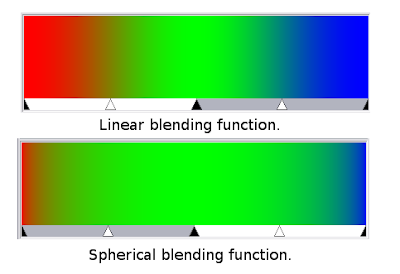
The above image shows how the blending function can make a difference.
A simple gradient will have 2 stoppoints and one segment, complex gradients may have more than one segments.
The way a gradient is represented in Gimp and Inkscape is different. Gimp defines gradient keeping segments in mind, Inkscape defines based on stoppoints.
So, now you know what all constitutes a gradient,Creating a gradient becomes a simple task.
Creating gradient with Gimp:
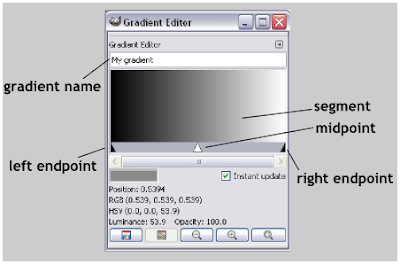
Press CTRL+G with Gimp open to launch the gradient dialog. Click on the ‘new gradient’ button to launch the gradient editor.
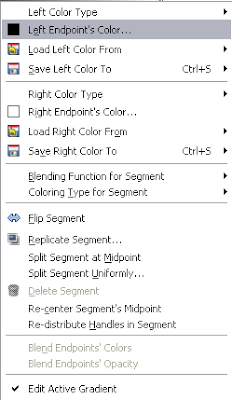
Right click on the segment brings up the menu for editing the gradient. The options there are quite self descriptive which you can try for yourself(some description is available here).
The gradient will be saved in the gradient folder of your Gimp work folder(check for the exact location in the preferences dialog box) as a .ggr file.
If you are wondering what is a .ggr file you can just open it with your favorite text editor to see what it is made up of. Gimp GGR format explains the format of GGR file. Sometimes you may find it difficult to set the position of some endpoint using the gradient editor, in that case editing the .ggr file with a text editor will come handy.
In Inkscape, the gradient editor does not use midpoint between stoppoints and allows only linear blending function.
Creating gradient with Inkscape:
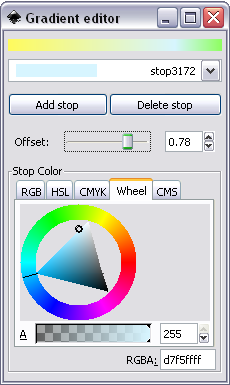
Draw any simple object (a rectangle would be fine), In the fill & stroke dialog box select linear gradient for fill.Now click on the edit button and your gradient editor appears. As I said earlier Inkscape uses endpoints to define a gradient, creating a gradient in Inkscape is nothing but adding stops and defining values of RGBA and position(offset) for that stops.
If you have appetite for more of gradients, you should try SpectraG, an opensource gradient editing software written by Rosros in Python. It represents gradients with formulas, so you need a understanding of little math but it appears to be a very interesting and immersing gradient editor. It allows importing and saving to .ggr format among various others.
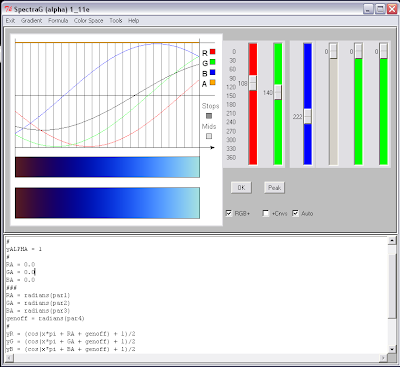 (a snapshot of spectraG)
Gradients are represented by different softwares in different formats. Gimp saves gradients as .ggr files, Adobe’s products use .ai, Inkscape saves within .svg file itself.
Importing gradients between Gimp & Inkscape is simple.
To import Inkscape gradient into Gimp, just place the SVG file containing the gradient into the gimp gradients folder and refresh the Gradient dialog. The gradients will be imported and you can see them in the gradients dialog.
To import Gimp gradient into Inkscape, you just need to drag and drop the gradients into Inkscape.Now you can just go on filling objects with gradient.
[Inkscape will throw an error while importing some .ggr files (files with CRLF end-of-file). What you can do to import is save it in unix format using a text editor like notepad++. and then import].
There is huge collection of gradients at Gradients Central that you can download and use.
Today in this era of digital art where images are represented widely in either raster or vector format, ANSI or ASCII art is something that we do not see much. I had seen text characters being used in text messages, email & chatroom/BB signatures and those notorious .nfo files but had never given it a thought that it was some kind of art. Just as I started to explore about it, I found a cool world of image representation that was so much popular a couple of decades ago. Character art is a form of art where the characters of a character set are used repeatedly to form an image. It is some what like each character represents a pixel of image.
It is said that early Egyptians used characters to represent images which may qualify as character art. Then during the era of typewriters, there were pictures typed on paper with text characters. This required great patience, planning and of course some artistic skills. In the early days of computers, there were no image formats. Moreover the monitors could display only a predefined set of characters. There was no way of displaying an image on a computer screen. This was when character art stepped into computers. A set of characters from ANSI or ASCII characters were aligned in rows and columns to draw images.
Both ANSI and ASCII art may seem to be the same, but they have their own differences.
ASCII art uses 95 printable characters of the 128characters of the ASCII character set. Any text editor can be used to create an ASCII art. The font used for this kind of art should be of fixed width for correct representation.
ANSI on the other hand uses 256 characters of the extended ASCII character set which includes block characters, suitable to draw images. Another differentiating factor is that ANSI art allows use of 16 foreground and 8 background colors with a 4-bit palette. But unlike ASCII art, ANSI art requires either DOS environment or a software capable of displaying ANSI art in its true color representation.
ANSI/ASCII art is not only restricted for static images, animation is also done. Infact in 1980’s, games were also designed with ANSI art.
Here are a few character art softwares that I played around:
1. TundraDraw
It is a basic ANSI editor allowing to work either in 4-bit or 24-bit color mode. The canvas is 80 columns wide, the function keys are mapped to block characters(can also be mapped to other predefined characters as well) and one draws by pressing the keys. This medium may seem evasive as you need a lot of patience and some practice to get something really presentable butonce you get hold of the character mapping, one can go on creating some great stuff.
2. Jave
This software took me by surprise. It is an ASCII art editor(a java application) flaunting features of a bitmap editor. It provides tools like freehand drawing, rectangle, ellipse, bezier curves,eraser, brush, clone tool and also a fill tool capable of filling with pattern & gradients. This is not only what it can do. It has a fractal tool to draw Mandelbrot set, a 3D rendering tool where you can create your own 3D objects, a function plotter and all this with characters.
It also has a figlet editor which allows you to write names with characters something like this in a plain text file. The textbox editor can be used to create some cool text email/forum signatures. It also has an image to ASCII converter to convert your images to ASCII art. Another feature worth mentioning is its movie editor allowing to draw frame by frame and make an animated ASCII movie.Then you can export it to either a gif file or a javascript animation.
3. Tim
This is a simple image to ASCII converter which produces some good results.
There are a lot more software and online applications that are capable of creating ASCII art, you just need to google for them.
I’m not good at this but here are a few of my experiments.
A flower vase in TundraDraw
My Moto with TundraDraw.
Fish in a bowl (ASCII animation(javascript) in Jave)
Rock in Figlet editor.
A House (ASCII art(txt file) with Jave)
An Image converted to ASCII (text file with Tim)[set font size to 2-3 with courier font in notepad]
You can look at following locations for more of ASCII and ANSI art.
http://www.ascii-art.de/
http://www.glassgiant.com
http://www.chris.com/ASCII/
http://sixteencolors.net/packs/index.html
http://www.squidoo.com/ascii
Illustrating rainbow with Tiled clones tool in Inkscape.
150 comments Posted by Vinay Raikar at 12:55 PMIllustrating Rainbow with Clone tool in Inkscape.
Rainbow and clouds.. by ~rockraikar on deviantART
After some gap, I'm back again. This post is about drawing a rainbow. There are actually two ways you can do it. One is by creating a rainbow color gradient and fill a semi-circle with it. The other is by using the tiled clones tool. Tiled clones happens to be one of the most powerful & interesting tool in Inkscape and here I am trying to draw a rainbow with it..
To start with, select the Spirals tool (F9 key) and draw a semicircle.
Let the settings be:
turns:0.50, divergence:0.00, inner radius:0.00.
Adjust the width, height and stroke width as in the image.
Now select the stroke color as the one with '?' (question mark :paint is undefined) in the stroke paint tab of fill and stroke menu. We need to do this because for changing colors of clones using clone tool it is necessary that the paint is undefined for the object. Now,the arc/semi-circle will be invisible.
Next is the cloning step.
Keeping the arc selected,
Go to edit->clone-->create tiled clones. The following settings needs to be updated:
Symmetry:P1 simple translation.
7 rows and 1 column
Shift: for X all the values are zero. for Y the per row field should be -98.5
Scale: scale X per row is -1.6, scale Y per row is -0.7, all others are zero.
Color: Initial color be red, for per row field change the H value to 13.5. Rest all should be 0.
We wont be using rotation blur & opacity so we can leave them as they are.
Now press create, your rainbow is ready.
Give it a little blur and decrease its opacity.
You have your Rainbow. You can add a few clouds like the ones here. Apply a little blur to these clouds and it will look a bit realistic.
Happy Inkscaping...
Labels: illustration, inkscape, tutorial, vector


