I was playing with gradients in Gimp and Inkscape and in this process, I came to know about a few things which I think would be apt if I share here (even though many may find it redundant or silly ;p ).
Here is a small account of basics about Gradient, how to create and share gradients.
Gradient, as you may know is gradual change or blending of color. As you will see in nature the colors of objects are not constant all over even though their skin is of same color. Just for example look at the nearest wall(if its painted with single color ), does the shade appear to vary ? Either due to the lighting or shape, the color of the object will appear to vary. That is where a simple gradient comes into picture. When you are imitating or illustrating objects it is quite necessary to use gradients to give it a realistic touch.
 (Black to white Gradient)
Now talking about the gradient and how is it represented in softwares like Gimp and Inkscape,
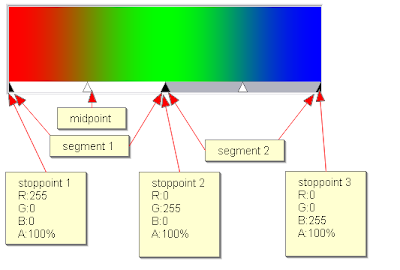
These are the basic features of a gradient irrespective of software:
1) Stops or stoppoints(endpoint): a gradient has atleast 2 stoppoints. Each stoppoint has properties of color,opacity(represented in terms of RGBA (Red,Green,Blue,Alpha) and position.
2) The region between 2 stoppoints is called a segment. The color from left stoppoint blends into right stoppoint within this segment. Blending function(linear,curved,sinusoidal, etc.,) is a function which defines how the colors blend into each other within a segment. There is also a midpoint which defines the middle point for the blending process.
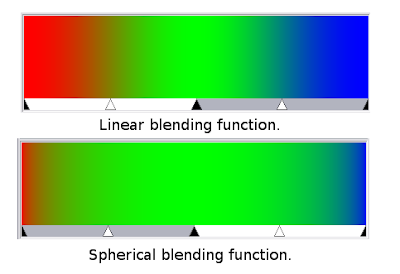
The above image shows how the blending function can make a difference.
A simple gradient will have 2 stoppoints and one segment, complex gradients may have more than one segments.
The way a gradient is represented in Gimp and Inkscape is different. Gimp defines gradient keeping segments in mind, Inkscape defines based on stoppoints.
So, now you know what all constitutes a gradient,Creating a gradient becomes a simple task.
Creating gradient with Gimp:
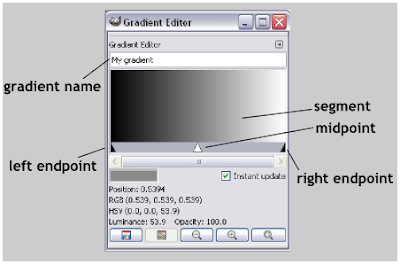
Press CTRL+G with Gimp open to launch the gradient dialog. Click on the ‘new gradient’ button to launch the gradient editor.
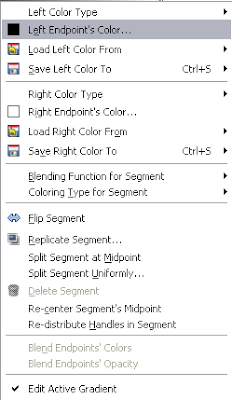
Right click on the segment brings up the menu for editing the gradient. The options there are quite self descriptive which you can try for yourself(some description is available here).
The gradient will be saved in the gradient folder of your Gimp work folder(check for the exact location in the preferences dialog box) as a .ggr file.
If you are wondering what is a .ggr file you can just open it with your favorite text editor to see what it is made up of. Gimp GGR format explains the format of GGR file. Sometimes you may find it difficult to set the position of some endpoint using the gradient editor, in that case editing the .ggr file with a text editor will come handy.
In Inkscape, the gradient editor does not use midpoint between stoppoints and allows only linear blending function.
Creating gradient with Inkscape:
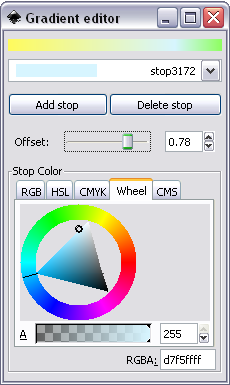
Draw any simple object (a rectangle would be fine), In the fill & stroke dialog box select linear gradient for fill.Now click on the edit button and your gradient editor appears. As I said earlier Inkscape uses endpoints to define a gradient, creating a gradient in Inkscape is nothing but adding stops and defining values of RGBA and position(offset) for that stops.
If you have appetite for more of gradients, you should try SpectraG, an opensource gradient editing software written by Rosros in Python. It represents gradients with formulas, so you need a understanding of little math but it appears to be a very interesting and immersing gradient editor. It allows importing and saving to .ggr format among various others.
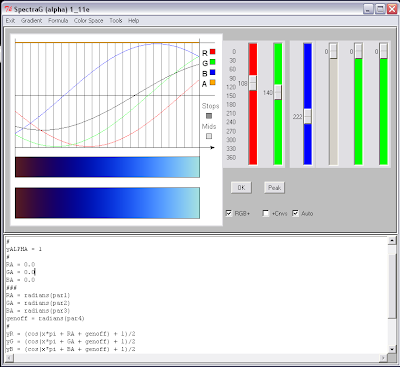 (a snapshot of spectraG)
Gradients are represented by different softwares in different formats. Gimp saves gradients as .ggr files, Adobe’s products use .ai, Inkscape saves within .svg file itself.
Importing gradients between Gimp & Inkscape is simple.
To import Inkscape gradient into Gimp, just place the SVG file containing the gradient into the gimp gradients folder and refresh the Gradient dialog. The gradients will be imported and you can see them in the gradients dialog.
To import Gimp gradient into Inkscape, you just need to drag and drop the gradients into Inkscape.Now you can just go on filling objects with gradient.
[Inkscape will throw an error while importing some .ggr files (files with CRLF end-of-file). What you can do to import is save it in unix format using a text editor like notepad++. and then import].
There is huge collection of gradients at Gradients Central that you can download and use.
