Painting is one of the oldest forms of art. One of my favorite painters happens to be Raja Ravi Varma. Romancing couple is one of my personal favorites. In fact in last century or so Hindus have seen Gods from his eyes ( I mean the way he has depicted). You can find a few of his paintings here.
Another painter that has fascinated the world happens to be Leonardo da Vinci. His paintings too have a great influence on how we see Jesus today. One of his greatest contributions to this world, 'The last supper' has gone online & I think everybody is really hooked onto it. The Nikon D2X camera took 1677 shots of the 460 x 880 cm painting powered by 2 Quad Core AMD Opteron processors to give a 16 billion pixels image of The Last Supper. It will be really advantageous to many art lovers as they can watch the minor details of the masterpiece live on their monitor screen and not have to travel to Milan. In fact they will get a better view of the painting sitting at their home. You can see the finest of the cracks in the painting. After Dan Brown's book 'The DaVinci code' , there will be many enthusiasts looking at this masterpiece eagerly.
If you still haven't seen the painting, here it is at the haltadefinizione's website.
At a resolution of 172181 x 93611, it really won't fit into any ordinary monitor so have to see it in pieces. At 100% zoom you can see 3.7 X 2 cm of the painting at a time. There is also the H9 watermark all over that may be disturbing to watch. It would have been better if there was some downloadable file that I could download to my machine and watch offline, but at that high resolution size downloading it is a big constraint too. May be they can provide some smaller resolution images for download.

If you are browsing with Internet explorer then press CTRL+A, else check this link.
Initially you saw Aishwarya , then when you selected the image you saw Abhishek. This is something called as CTRL+A images that I found through an email. So I thought of doing one. The one I got above is pretty decent one. You can google it up for CTRL+A images to find many more such images. There are also few pages explaining you how to do it, but all of them with Photoshop. I thought of posting a small How-To for all those who cannot buy Photoshop but can get a free copy of Gimp.
First of all, the funda behind the camouflaged image:
This image consists of two images embedded into each other. Alternate pixels from these two different images are selected into one image. Further the levels of the image to be hidden is varied to make it a bit invisible.
Why this image shows in MS applications only is that when image is selected in those applications it masks it with a grid showing only alternate pixels.
Requirements:
You need two images, Normal image and the Camouflaged image. The Normal image(one which you see normally) should be somewhat dense and varied so that it can cover the camouflaged image. Its better to stick to a simple single subject image for camouflaged image.
Steps: Fire up GIMP

1) Create a new image (appropriate size as that of your images). Drag and drop the two images into your new image. Let the layer containing image to be camouflaged be above the normal image layer.

2) Create a new layer above them (Layer-->New layer). We need to fill it with a grid pattern. You can create your own pattern of a grid with black & transparent blocks or else just download this pattern. Copy this into patterns folder of your Gimp installation.
3) Fill this new layer with this Grid pattern.(using bucket fill tool and selecting pattern fill from tool options tab)

4) Select this layer,zoom in about 800%, go to select-->select by color. Then select any black block from the grid.

5) Now select the image to be camouflaged in the layer dialog box and press CTRL+X to delete the selected pixels. Now zoom out to 100% and toggle the visibility of the Grid layer.

6) this will be a trial & error step. Once you get a hang of it you'll know what to do & how much to do. Now select the camouflaged image layer, go to Layers-->colors-->levels and adjust the output/input levels(move theoutput levels slider to the left) so that the camouflaged image's visibility decreases. Again toggle visibility of the grid layer to see the camouflaged image. By switching the visibility of the grid you can see how your final image will look. If you are not satisfied with the output, then undo(edit-->undo history, select levels & press undo) the levels adjustment and try once more.


7) When you are satisfied with step 7, you are ready to save. Tun off the visibilty of grid layer.Save the image as png or jpg format & view it.
Tips for good result:
The camouflaged image should blend into the normal image so choosing two images that blend in well is really important. Generally the normal image should be something that is filled with lots of objects & stuff and image to be camouflaged must be a simple object with plain background. To check if the images will blend in or not, after step 1, decrease the opacity (in layer dialog box) of camouflaged image to about 40% and using Move tool (press M or tools-->transform tools-->move) move the layer to see if this image hides in well. For the abhi aish image above there was some decent match between the two.
The step 7 is the most disturbing & annoying if you don't get it properly. Most of the times there will be a small shade of the hidden image. If you adjust the levels too much, you might not see the hidden image when selected. If you do the levels a bit less there will be a shade of hidden image.Its a compromise.
And one warning, don't try this with a large image. When you select the pixels, your system may get too slow. So try with smaller (about 600px width) images.
If you stumble upon some similar image what you can do is open it with gimp, create a new layer above it and fill it with grid pattern. Using move tool shift the grid layer, you can alternately see both the images.
I'm not pretty good at explaining, hope you find it useful. Happy camouflaging :)
I wanted to have a globe with those latitudes & longitudes on it.I was doing it manually earlier by duplicating and resizing, but there's the clone tool to do that easily. Here is a tutorial on how to do a simple globe with latitude/longitude. I have a very bad color sense so you can surely do a better job with colors. :)
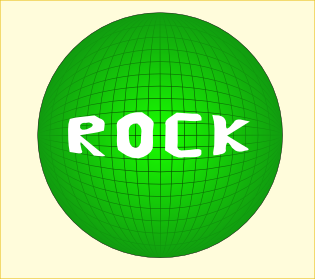
Here is what we can have
1) draw a perfect circle (holding ctrl key) with no fill and black stroke. 2) Now we need to do some cloning.
Select the circle and go to edit-->clone-->create tiled clones.
Select 'simple translation' for symmetry and following settings for shift and scale.
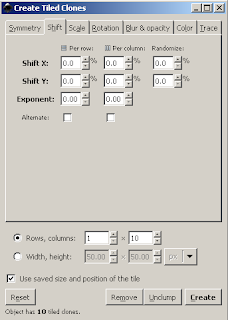
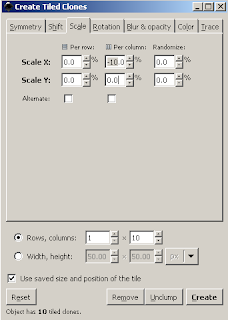 3) We will get something like this.
Now select them all and go to edit-->clone-->unlink clone (or shift+alt+D)
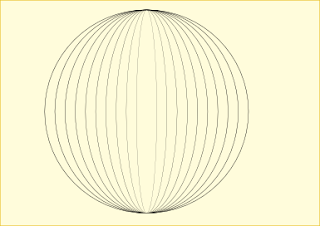
4) Now draw a straight line from top center to bottom center to get the equator / meridian.
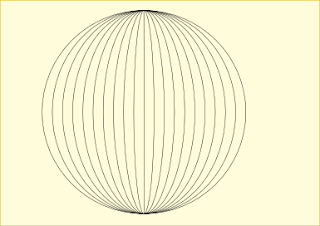 5) Now duplicate this and do object-->rotate 90 degree.
We have the latitude & longitudes. Now select these and go to path-->combine.
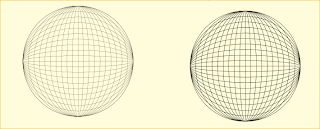 6) Now lets get back to the original circle give it a radial gradient.
And place the latitude/longitude globe over it. ( Use align and distribute tool to center the circles)
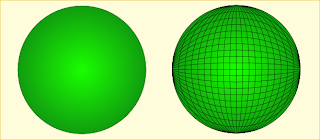 7) You can also give a radial gradient to the latitude/longitudes, to get something like this.
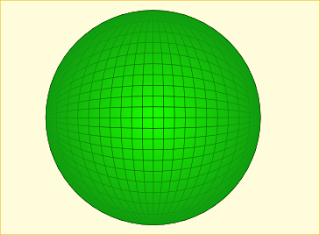 8) Now you can write something at the center of the globe with bezier tool using the latitude/longitude as a grid.
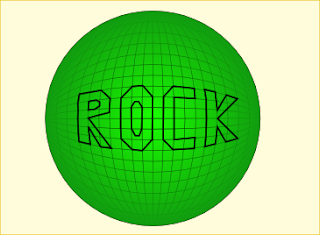 9) Now select these letters and move sideways for editing. Give them a color fill and remove the stroke.
 10) Do a path--> union of these letters and apply path-->simplify.
 11) Give the text some suitable color, do some resizing(decrease height holding shift) and place it over the globe.
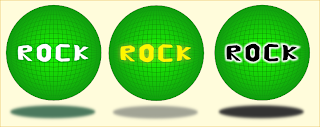
Further you can do things like giving the text or the globe a shadow effect etc like the one by heathenx here.
[ Edit: Stumbled upon this youtube video. Its really cool how you can build up on the globe layout... though its pretty tough to draw ]
The whole how-to in PNG format is available at deviantArt here. Happy Inkscaping.
I was just going through a few wallpapers and was impressed by Fractal's. A fractal is a geometric shape that in a part is made up of a smaller but similar shape. More about it here.
Wanting to try a few fractals I googled up and stumbled up on fractalview. Downloaded it from sourceforge and tried it. Its a java based so just had to set the classpath and ran it.
Fractalview is a java application for viewing a few common fractals ( Mandelbrot set, Julia set). It runs in a fullscreen mode showing up a fractal. By using different keys you can change the parameters like julia constant, colors or do a zoom and even save it as a PNG file.
Few fractals I captured are here.

The fractal view gallery has some good ones. Gimp has also got a very good plug-in for generating fractals called as fractal explorer It happens to be the easiest and best one I ever found.
Labels: fractal, sourceforge
I didn't really want to make "HOW TO WRITE YOUR NAME IN 3D" as the title of the post but yes, one curious artist landed on my blog from google search with the search string "HOW TO WRITE YOUR NAME IN 3D".
I'm also interested to write something in 3D but I dont have any 3D drawing softwares. Well I can use Inkscape for 3D looking text but its cumbersome & lot of work.
May be you need software like blender to do that or may be the google sketchup.
I tried with google sketchup.
here's the result
Then did a touch up with Gimp. Here's the result. All I did this in 4 minutes. So if you give it some time you can do wonders with it.
Labels: gimp, googlesketchup
I am fascinated with Bézier curve and playing with it a lot these days. No graphic design software is complete without Bezier curves. The mathematical definitions here seem complicated, but the animations(Constructing Bézier curves in wikipedia) make for such easy understanding.
When working with Inkscape, this tutorial gives you the basic idea of editing bezier curves. Illustrating complex objects needs some mastery of bezier curves.
Here's an understanding my mind has about bezier curves.
Each bezier curve has two end points (p1 and p2) and two control points (c1 and c2).
Control line is line joining control point and corresponding end point(p1,c1 or p2,c2).
The shape of bezier curve depends on the position of control point, that is
a) distance between control point and the corresponding end point (control length).
b) angle made by control line with line joining end points (control angle).
The control line from an end point is tangent to the bezier curve starting from that end point.
A straight line is a bezier curve where control angles are zero.
A complex object can be drawn using multiple bezier curves.
Though control length may seem less important(in deciding the curvature) but when the end points are near, it makes a lot of difference.
Labels: bezier curve, inkscape
Got myself a deviantArt account. The designs there are superb.
By the way I tried to illustrate my Motorola C168 mobile handset using Inkscape. It has come up really cool though I could have given some time to bring in the details... Anyways I'm happy with what I got :)
My Moto C168 by ~rockraikar on deviantART
If you want to see what all objects makes this, the svg is here.
Labels: deviantart, illustration, mobile
